
Bulk Actions
Selecting Multiple Assets
Click checkboxes in the top-left corner of asset cards to select individual assets.
Use Select All in the toolbar to select all visible assets on the current page.
A bulk action toolbar appears at the top of the grid showing your selection count. Click Deselect All or the X icon to clear your selection.
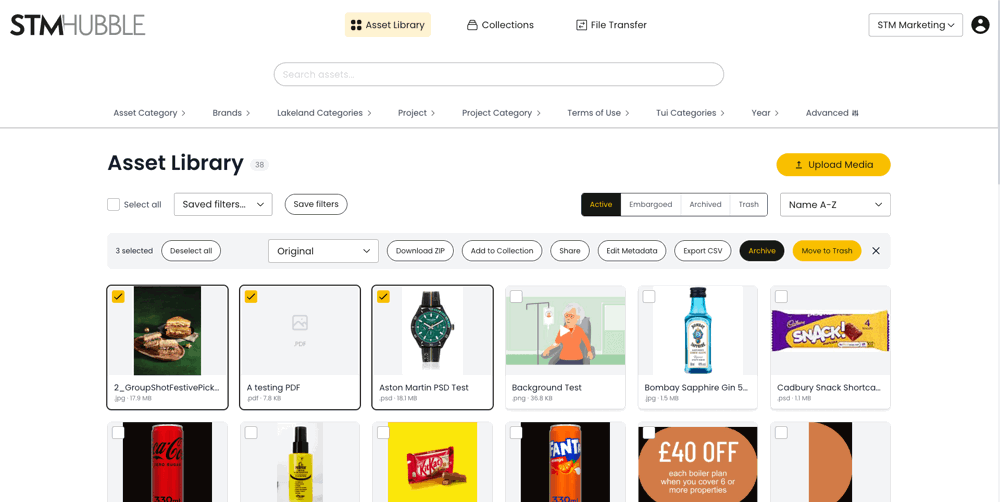
Available Bulk Actions
The actions available to you depend on your permissions. The toolbar may include any of the following.
Download ZIP
Package all selected assets into a single ZIP file for download. Choose a size preset (Original or other available options) from the dropdown before clicking Download ZIP. The ZIP is generated in the background.
Add to Collection
Add all selected assets to an existing collection or create a new one. Opens a collection picker showing your available collections.
Share
Create a single share link for all selected assets. Set the access level (View only or View & Download) and link expiry. Copy the generated link to share with others.
Edit Metadata
Apply metadata changes to all selected assets at once. Opens a metadata form — any values you set will be applied to every selected asset. Leave fields blank to keep existing values unchanged. This is great for bulk-tagging or categorising a batch of assets.
Export CSV
Download a CSV file containing the metadata for all selected assets. Useful for reporting, auditing, or importing into other systems.
Archive
Move selected assets from Active to Archived status. Archived assets are hidden from the default view but can be found under the Archived status tab. This action can be undone with Restore.
Restore
Restore assets from Archived or Bin status back to Active. Available when viewing the Archived or Bin status tabs.
Move to Bin
Move selected assets to the Bin. Binned assets can be restored or permanently deleted by an administrator. A confirmation dialog appears before this action is executed.
Permanently Delete
Permanently remove selected assets from the system (super admin only). This action cannot be undone. Available only when viewing the Bin tab. Requires confirmation.
Confirmation Dialogs
Destructive actions (Archive, Delete, Permanently Delete) always show a confirmation dialog. The dialog shows the number of affected assets and a description of what will happen. Click Confirm to proceed or Cancel to abort.
Tips
Use bulk edit metadata to quickly categorise a batch of newly uploaded assets.
Export CSV is helpful for auditing asset metadata or sharing inventory reports.
Archive instead of delete when you might need assets again later — archived assets are easily restored.
Bulk download as ZIP is the fastest way to get a set of assets for offline use.
The bulk toolbar stays visible as you scroll, so you can always see your selection count and access actions.