
Uploading Assets
This guide walks you through uploading files to the DAM portal, adding metadata, and understanding the approval workflow.
1. Before You Upload
You need upload permission to see the "Upload Media" button. If you cannot see it, contact your administrator.
Supported file types include:
Images: JPEG, PNG, GIF, WebP, TIFF, BMP, PSD, AI
Videos: MP4, MOV, AVI, WebM
Audio: common audio formats
Documents: PDF, Word, Excel, PowerPoint
Thumbnails are generated automatically for images, PDFs, AI files, PSD files, and videos.
Files that do not have a generated thumbnail will display a file-type icon instead.
2. Starting an Upload
Click the Upload Media button in the top-right corner of the asset library.
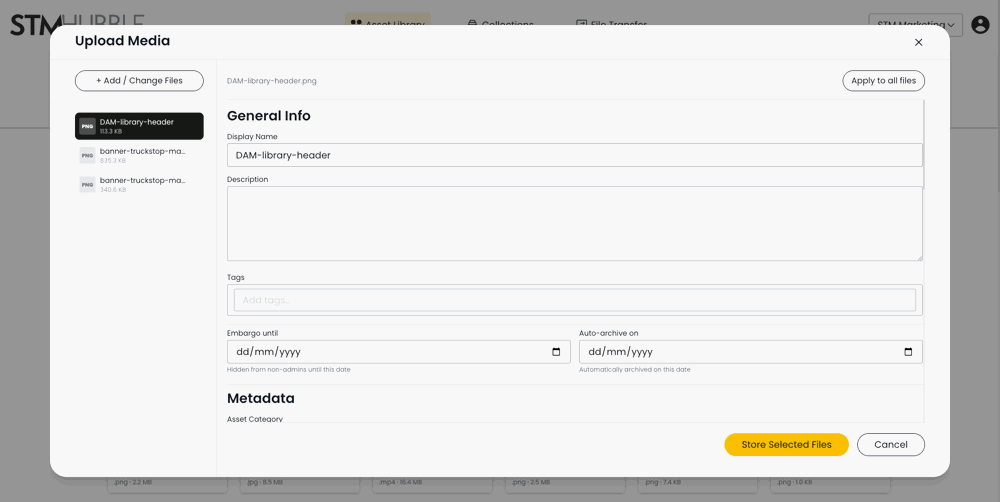
The upload modal opens with a two-panel layout: a file list on the left and a metadata form on the right.
Click Add/Change Files or drag and drop files into the modal to select the files you want to upload.
3. Per-File Metadata
When you select multiple files, each one appears in the left panel showing its file-type badge, name, and size. Click a file in the left panel to switch to its metadata form on the right.
Each file has the following metadata fields:
Display Name -- defaults to the filename (without extension). Edit this to give the asset a clear, descriptive name that will be easy to search for.
Description -- an optional text description of the asset.
Tags -- add freeform tags by typing and pressing Enter or comma. An autocomplete dropdown suggests existing tags and shows how often each has been used.
Embargo Until -- set a date to hide the asset from non-admin users until that date.
Auto-Archive On -- set a date for the asset to be automatically archived.
Custom Metadata Fields -- additional fields configured by your administrator (e.g. Brand, Product Category, Campaign). Required fields are marked with a red asterisk (*).
To remove a file from the upload queue, click the X button next to it in the left panel.
4. Apply to All Files
When uploading multiple files that share the same metadata:
Fill in the metadata for one file.
Click Apply to all files.
The metadata is copied to every other file in the queue.
Display names are auto-incremented to keep them unique (e.g. "Campaign Photo (1)", "Campaign Photo (2)").
This saves time when uploading a batch of related assets.
5. Submitting Your Upload
What happens when you submit depends on your permissions:
If you have moderator or bypass permission: the button reads Store Selected Files. Your assets are published to the library immediately.
If you do not have bypass permission: the button reads Upload for Approval. Your assets are queued for an administrator to review before they appear in the library.
Each file is uploaded individually with its own metadata. A success message confirms how many assets were added or submitted for approval.
6. Upload Approval Workflow
If your uploads require approval:
Your assets enter a Pending Approval state after submission.
An administrator reviews your uploads in the backoffice.
The administrator either approves or rejects each asset.
Approved assets become visible in the asset library.
You will not see pending assets in the main library until they are approved.
7. Tips for Successful Uploads
Use clear, descriptive display names. These are searchable and help your colleagues find assets quickly.
Add relevant tags to improve discoverability. The more accurate your tags, the easier it is for others to find what they need.
The meta tags available for each client are set up by an administrator, and are unique to each client. If you can't see a meta filter you need to add please contact your administrator.
Set embargo dates if assets should not be visible to all users until a specific date, such as a campaign launch.
Set auto-archive dates for time-limited content that should be automatically archived after a certain date, such as seasonal promotions.